

First of all, we would like to thank our regular contributor and fast becoming tutorial writer Gerbe Dumahil. In this episode, Gerbe shares a simple yet very effective workflow of 3d Animation. Let us see his Vray SU set uo and how he stitched his still images using After Effects. This tutorial is divided into two parts; Part 1 the VraySu set up, and Part 2 the stitching of rendered image stills using Adobe After Effects.
Before going to the different tutorial steps, let us watch briefly this Vray SU animation courtesy of Gerbe Dumahil.
Vray for SketchUp animation test from Gerbe Dumahil on Vimeo.
PART 1: Vray Sketchup Animation Set-up
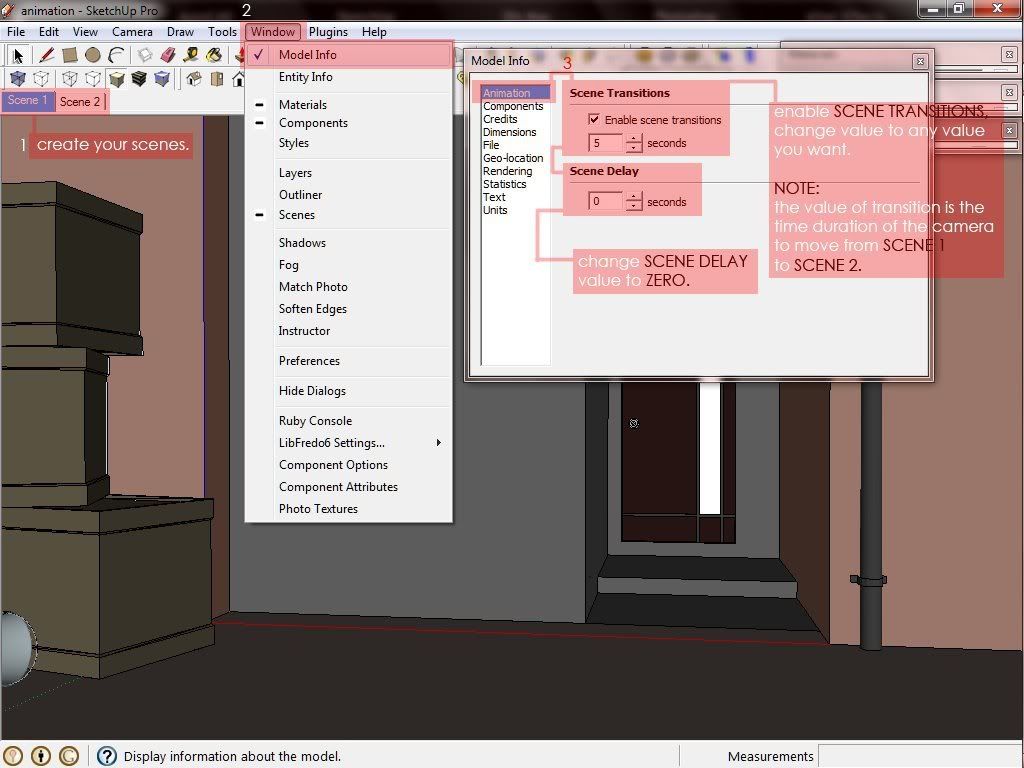
Step 1. Scene transition set-up in Google SketchUp
Set-up the animation scene and settings in Google Sketch-Up. Once the key frames (beginning and ending scenes) were established, we will set up the scene transition in Sketchup. Go to Windows/ Scene Transitions and click animation. Under the Scene transition, we will enter 5 seconds (its up to you how long this would be). It is also important to change the scene delay to zero "0".
Step 2: Animation Setting in VraySU
Here we need to choose the output size* (1) and the render output (2). We need to tick Animation on and select frame rate (3). It is very important to tick "include frame number" because we need the render stills to be numbered sequentially when we stitch the animation using Adobe After Effects.
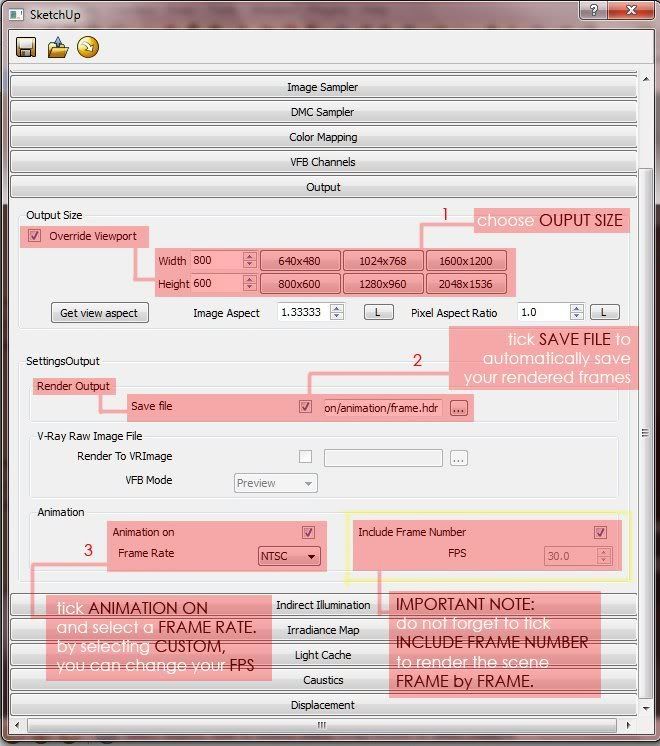
*Note: for the output size, you can select a lower output for the pre-calculated passes and then for the final render, you can select a bigger output size.
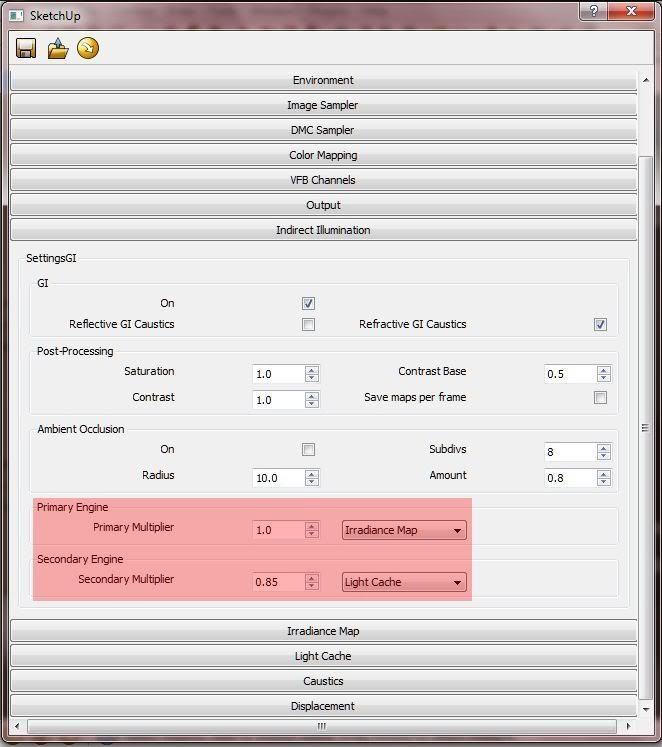
Step 3: Setting up the Irradiance Map (IR) and Light Catche (LC)
Now this is an important step to speed up the rendering process of the animation stills. Let the primary engine to be Irradiance Map and Secondary Engine as Light Catche.
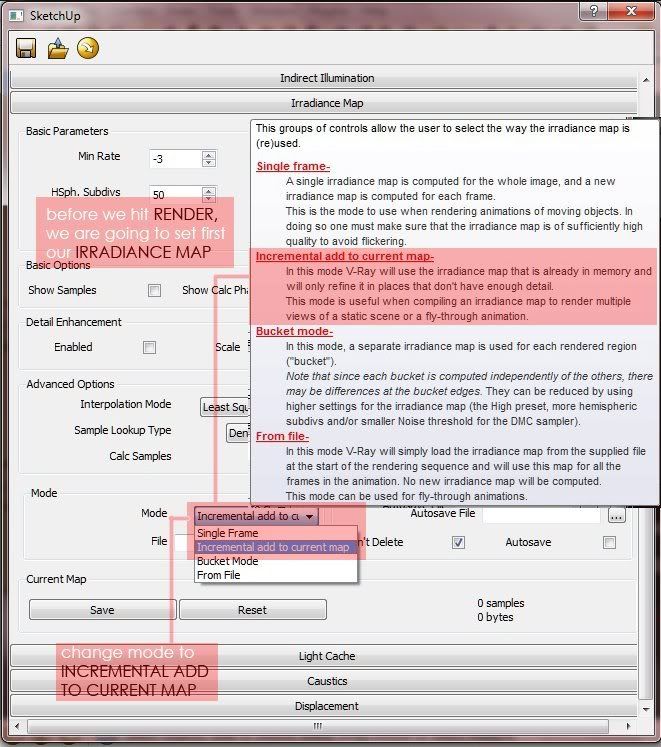
Step 4: Pre-calculation of Irradiance Map and Light Catche
In this step, both the Irradiance Map and Light Catch passes will be pre-calculated. We will tell Vray to only calculate the passes and not render the final image. To do this, we will select "incremental add to current map" mode in the Irradiance Map roll-out
In the Light carche roll-out, the mode will be "Flythrough".

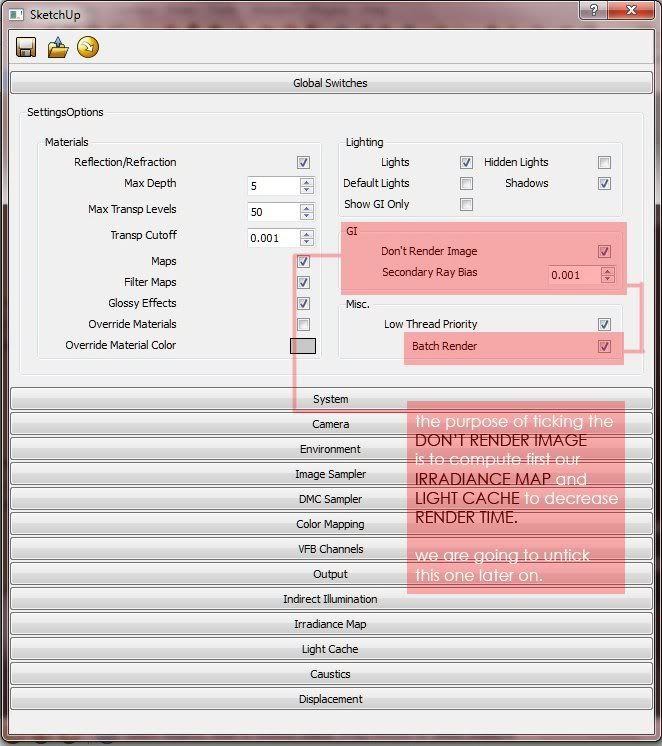
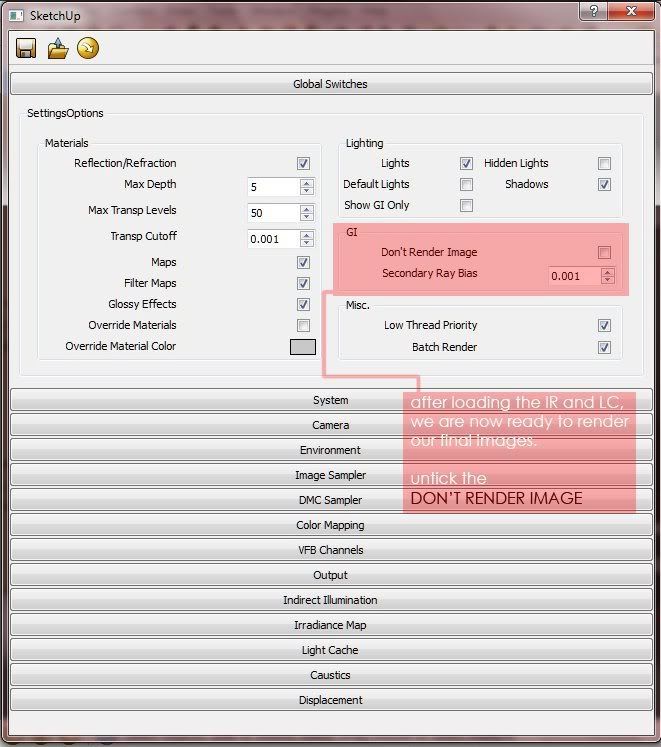
Finally, in the Global switches/ GI, tick "Dont' Render Image". We will also tick :Batch Render".Then hit Render.
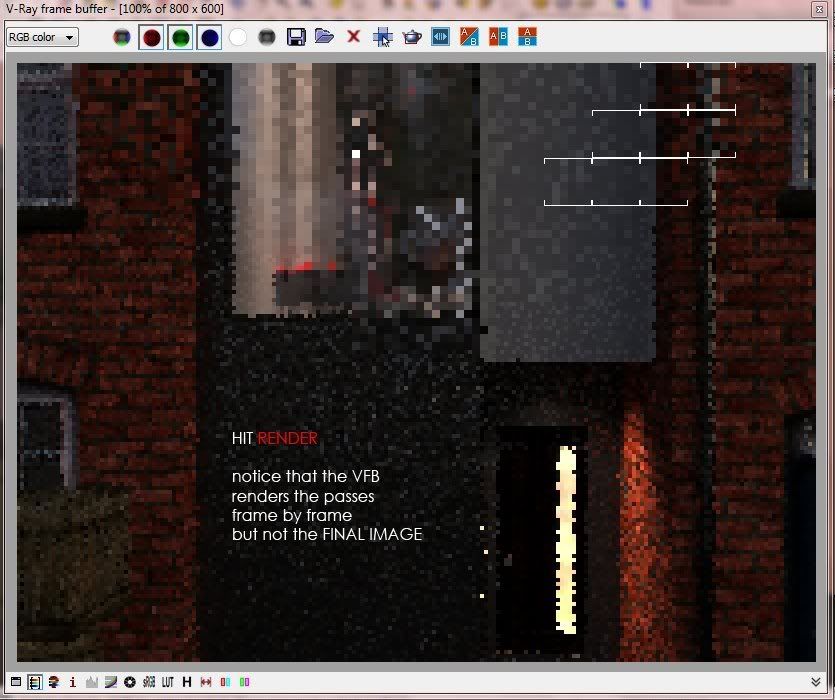
In the belowVray Frame buffer, the frame by frame passes were calculated but not the final image.
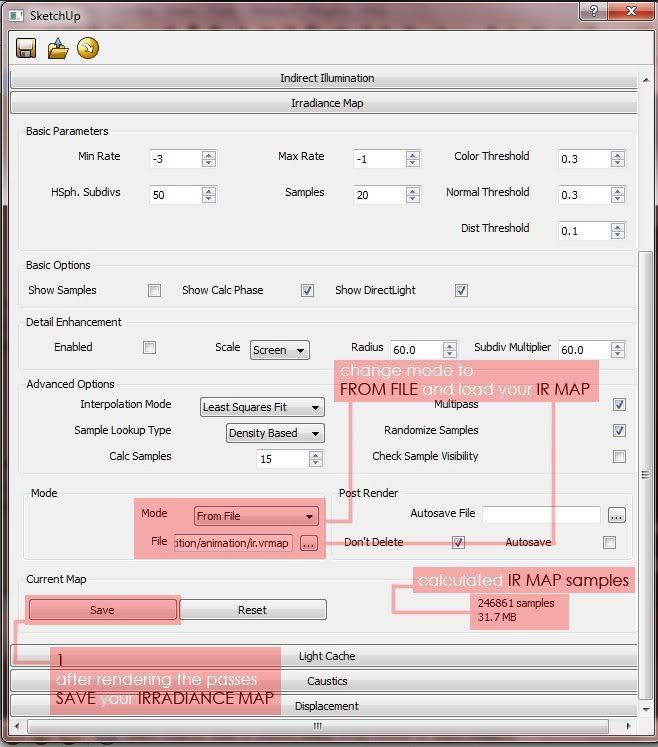
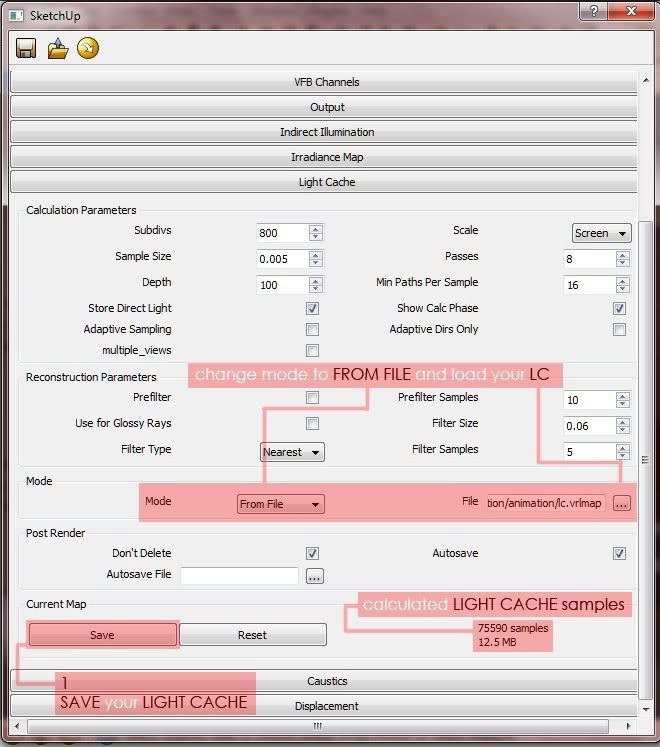
Step 5: Saving the pre-calculated passes
After the pre-calculation of the passes, we will save our irradiance and light catche maps. Then we will load them again, this time we will change the mode "From File" and load the saved Maps. (see the images below)
Step 6:Rendering the final images
After loading the files, we are now ready to render the final image. Under Global switches, we will now untick "Don't Render Image".
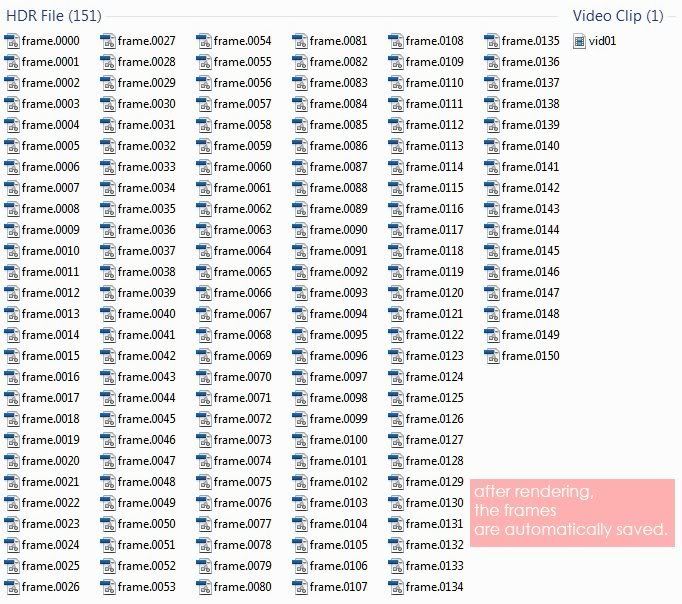
Here are my rendered files, all rendered files were automatically saved and they were numbered and named sequentially.
PART 2: Stitching the Vray Render Stills using Adobe After Effects
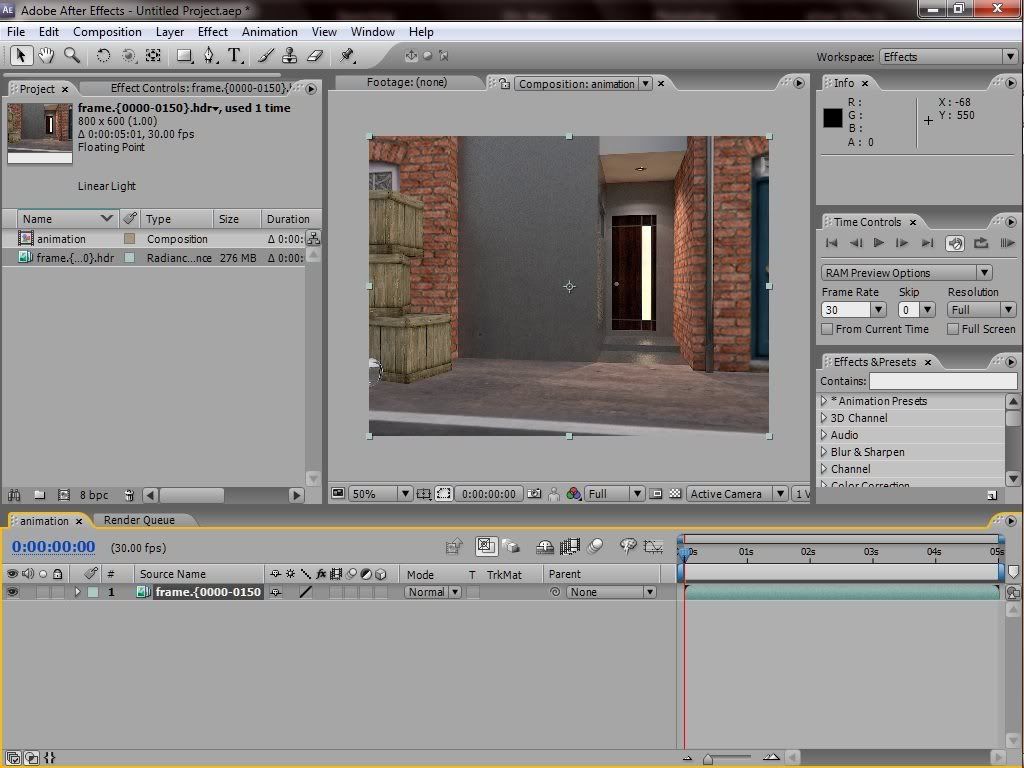
Open Adobe after Effects. Click composition and create New composition. Under composition settings, set up the file name, output size, frame rate and time duration.

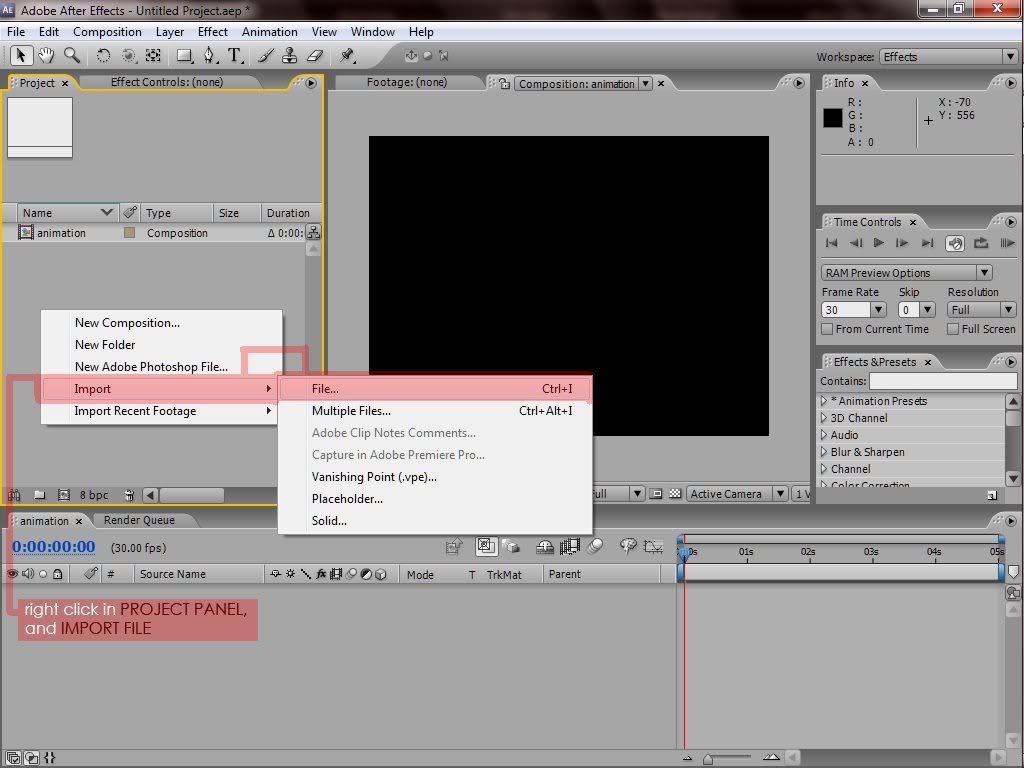
Import the Vray rendered files by right clicking the project panel, import and browsing the initial rendered files we have rendered in Vray SketchUp.
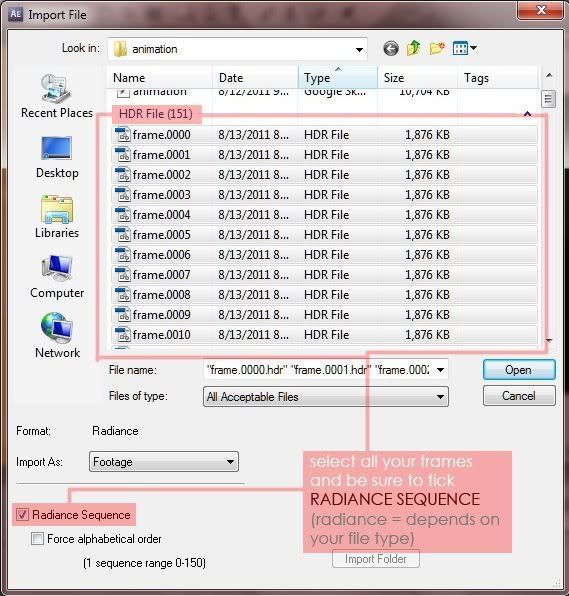
Select all the files and be sure to tick "radiance sequence". This depends actually in your file type. Here I used hdr output.
Files are now being loaded in Adobe After Effects.
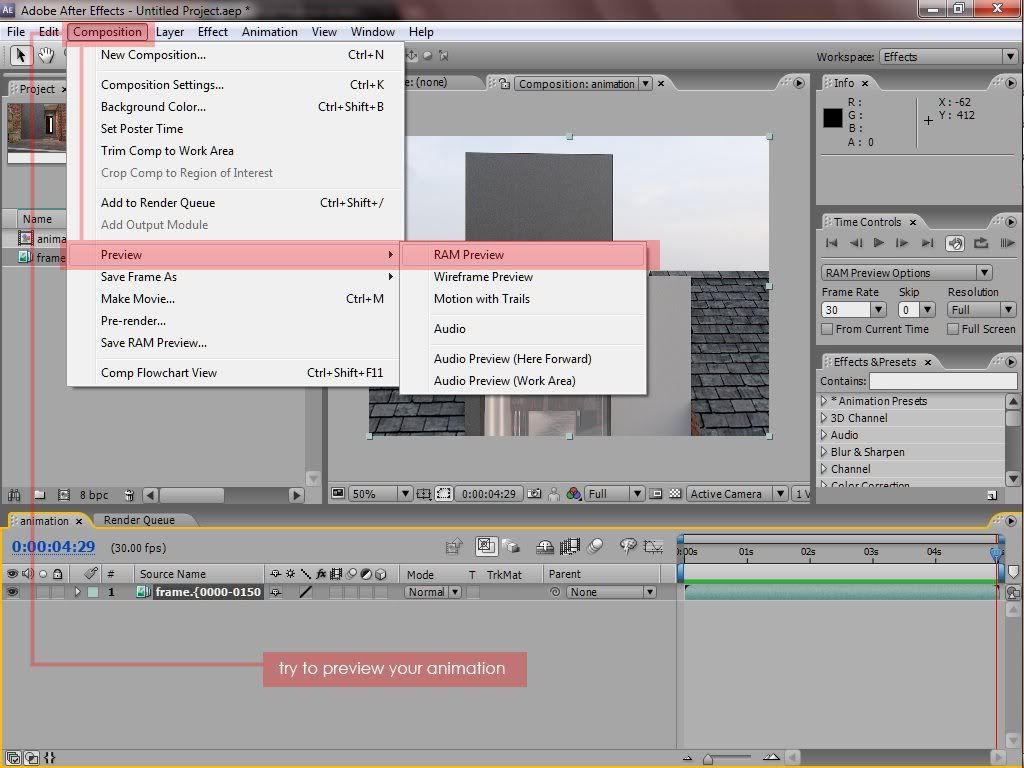
Preview the animation by going to composition, preview/ RAM Preview.
If you are happy, we can now export the scene with any Movie files that you prefer. Here I selected File/ Export/Avi.

That's it folks!
Before going to the different tutorial steps, let us watch briefly this Vray SU animation courtesy of Gerbe Dumahil.
Vray for SketchUp animation test from Gerbe Dumahil on Vimeo.
PART 1: Vray Sketchup Animation Set-up
Step 1. Scene transition set-up in Google SketchUp
Set-up the animation scene and settings in Google Sketch-Up. Once the key frames (beginning and ending scenes) were established, we will set up the scene transition in Sketchup. Go to Windows/ Scene Transitions and click animation. Under the Scene transition, we will enter 5 seconds (its up to you how long this would be). It is also important to change the scene delay to zero "0".

Step 2: Animation Setting in VraySU
Here we need to choose the output size* (1) and the render output (2). We need to tick Animation on and select frame rate (3). It is very important to tick "include frame number" because we need the render stills to be numbered sequentially when we stitch the animation using Adobe After Effects.

*Note: for the output size, you can select a lower output for the pre-calculated passes and then for the final render, you can select a bigger output size.
Step 3: Setting up the Irradiance Map (IR) and Light Catche (LC)
Now this is an important step to speed up the rendering process of the animation stills. Let the primary engine to be Irradiance Map and Secondary Engine as Light Catche.

Step 4: Pre-calculation of Irradiance Map and Light Catche
In this step, both the Irradiance Map and Light Catch passes will be pre-calculated. We will tell Vray to only calculate the passes and not render the final image. To do this, we will select "incremental add to current map" mode in the Irradiance Map roll-out

In the Light carche roll-out, the mode will be "Flythrough".

Finally, in the Global switches/ GI, tick "Dont' Render Image". We will also tick :Batch Render".Then hit Render.

In the belowVray Frame buffer, the frame by frame passes were calculated but not the final image.

Step 5: Saving the pre-calculated passes
After the pre-calculation of the passes, we will save our irradiance and light catche maps. Then we will load them again, this time we will change the mode "From File" and load the saved Maps. (see the images below)


Step 6:Rendering the final images
After loading the files, we are now ready to render the final image. Under Global switches, we will now untick "Don't Render Image".

Here are my rendered files, all rendered files were automatically saved and they were numbered and named sequentially.

PART 2: Stitching the Vray Render Stills using Adobe After Effects
Open Adobe after Effects. Click composition and create New composition. Under composition settings, set up the file name, output size, frame rate and time duration.

Import the Vray rendered files by right clicking the project panel, import and browsing the initial rendered files we have rendered in Vray SketchUp.

Select all the files and be sure to tick "radiance sequence". This depends actually in your file type. Here I used hdr output.

Files are now being loaded in Adobe After Effects.

Preview the animation by going to composition, preview/ RAM Preview.

If you are happy, we can now export the scene with any Movie files that you prefer. Here I selected File/ Export/Avi.

That's it folks!
no salen las imagenes
ReplyDeleteimages do not go
Nomeradona Sketchup Vr: Tutorial: Vray Sketchup Animation >>>>> Download Now
Delete>>>>> Download Full
Nomeradona Sketchup Vr: Tutorial: Vray Sketchup Animation >>>>> Download LINK
>>>>> Download Now
Nomeradona Sketchup Vr: Tutorial: Vray Sketchup Animation >>>>> Download Full
>>>>> Download LINK ZY
re-uploaded
ReplyDeletenice.... tutorials
ReplyDeletethanks Dody...
ReplyDeletei have no LC or IR file to load. What am i doing wrong?
ReplyDeleteCater.. did you saved them? You need to save them first after the calculation phase. put them on one place. then load them again.
ReplyDeleteIs there a plug in that enables sketchup + vray to animate moving geometry such as a door opening?
ReplyDeletethanks a lot NOMERADONA.!! it´s very useful in VfSU!!
ReplyDelete@De Selby,, yes animate su. check it out at suplugins.com
ReplyDeletehow do i save them? when i'm in the v-ray frame buffer screne i can't choose "save as a ir.vrmap" and if would would load my saved .hdr-files i can't choose them all at once just one at the time
ReplyDeleteCan you help me?
thanks, Caster.
Im failuring everytime when i do this, im saving the maps and doing the tutorial step by step, it all works fine with the precalc, but when i do the final render it stucks and renders the first frame over and over again, it never moves forward,please can anyone help me to get this working right, don't know what iam doing wrong.
ReplyDeleteMark T
@Caster Vermoortele
ReplyDeleteHi Caster, I would like to answer your questions. You cannot save your "ir.vrmap" through the VRAY FRAME BUFFER. Remember that you can only save your IRRADIANCE MAP (ir.vrmap) and LIGHT CACHE MAP (lc.vrlmap) AFTER you pre-calculated your scene. Check back these screen shots http://i334.photobucket.com/albums/m421/nomeradona_1234/TUTORIALS/A8.jpg and http://i334.photobucket.com/albums/m421/nomeradona_1234/TUTORIALS/A9.jpg.
What software are you using in stitching your frames? After Effects? Try to import MULTIPLE FILES in After Effects then select all your frames.
@Mark T.
Hi Mark, did you check the ANIMATION ON? And did you check the INCLUDE FRAME NUMBER too? http://i334.photobucket.com/albums/m421/nomeradona_1234/TUTORIALS/A2.jpg
thanks Gerbe for pitching...
ReplyDeleteHi Nomerodona.
ReplyDeleteI have finally got it working, i don't know what i did wrong, but yes the both buttoms were OK, somehow it just works now?
Thanks for you reply.
Mark
This comment has been removed by the author.
ReplyDeleteI get the movie files very bright if i compare to still pictures, the scene is an interior scene with no external light, i have take down the exposure a lot and also the shutterspeed, but i still seeme to get them very bright, Do you have any tips to do in this matter.
ReplyDeleteMark
where are the frames been autosaved becous i cant find them anywhere
ReplyDeletecalvin
Hello, thank you for this tutorial so much!!
ReplyDeleteBut I'm getting a problem too: I've done everything right in fact the rendered frames come out very nicely... the problem is that it is taking forever, i set 5 seconds of animation and 20,0 FPS, I'm sure of this but VRay is making way more than 100 frames!! I launched it yesterday evening and it is not done yet, it has rendered 500 frames by now so I believe it's making 1000 instead of 100!!! My friend noticed that i wrote "20,0" instead of "20.0" but I don't it's the problem since all my sketchup datas are with comma and not dot.
Then what's the problem? Please help me out, I don't understand...
Finally I found you... Nice Tutorial.... Thank you!!!
ReplyDeleteeverything goes righte untill the rendering of final frames, even i can see each frame getting rendered , but in the output folder no images are saved...... not a single frame
ReplyDeletePLEASE HELP ASAP.............!!!!!!!!!!!!!
This comment has been removed by the author.
ReplyDeleteJAI Gokhale: I have the same problem with the saving files. Does anyone know what can I do about it? I´ve tried to save it into several different folders etc.No solution..
ReplyDeleteThank you.
@everyone who is having a hard time finding their rendered images, you have to update your vray. I had the same problem and I was already going nuts until I tried to update my vray and everything worked well. well except on one thing.
ReplyDelete@nomeradona.. man I'm a fan and I absolutely love your tutorials. However, in this tutorial, I did everything you told us to but I'm having this weird colors with my renders whenever I render my flythrough animation. Any advice on this sir? Thank you very much.
Patrick its a bug with your version i think. we are hoping vray will address this issue when saving passess.
ReplyDeletei think i have the same problem,
Deletegetting solid colors like red blue and green...
someof my scenes works fine.... Does it matter of long is the animation? and if i rotate the camera to much?
i use vfsu 1.49.01... do u recommend of another version?
tnx man!
This comment has been removed by the author.
DeleteGreat Tutorial, Im new to sketchup and v-ray but i been practicing a lot with your tutorials. I have one question, i have a 27 scene sketchup doc and following your rendering set up (except I did 2.5 sec scene transition on the sketchup animation setup) the rendering is only maybe 10% done and it has exported around 200 hdr files. I calculated that its around 45 exports per scene and i will end up with over 1,000 exports!
ReplyDeleteit doesn't sound right, any advice?
@nomeradona - This tutorial is very interesting.. I was looking for it since long time and finally I got it. One question - in your frame buffer window I can see around 8 square working where as in my comp its only 2. I ve seen this in some of other you tube tutorial as well. Pls advise if this is a setting where we can increase the number of square to ve faster rendering or its something else.
ReplyDeleteYour urgent attention would be highly solicited. thnx.
Rgds,
Sanjeev
Hello sanjeev,
Deletecan i ask you a copy of vray? i have installed the 1.49 ver but it doesnt work. i have already uninstalled the older version because it requires me to.
thanks in advance
@sanjeev...dude number of squares depends on processor...urs is dual core i guess..quadcore gives 4 squares
Deletehello,
ReplyDeletehow can i download the new version of free vray 1.49.1 for sketchup? i have downloaded it and my previous vray was uninstalled then its not working anymore.
please help
chaosgroup.com
DeleteLike ^^
ReplyDeleteThank you for this wonderful, detailed step by step tutorial.
ReplyDeleteI'm creating graphics for a game. I wish that there was an easier way to create CG. It's not only doing artwork, but concepts & software and animation, & so on! Anyway, I really like all of the helpful art info on this post.
Keep up the good work!
architectural design schools
Hi
ReplyDeleteThanks for the tutorial. I get to the final rendering phase fine but the final images are coming out extremely colourful.
Any ideas?
Tom
Thanks for the tutorial. Proficient in Max but learning Sketchup so in some ways it's similar. Question though please. I have a file with 3 scenes that are say, 3 seconds, 3 seconds, and 10 seconds long. Compared to 3ds Max where you simply see your frame numbers, I see no indication of anything in Sketchup's VRay of where you start or end a scene animation.
ReplyDeleteIf I stop my scene render after Frame 30, is there any way I can pick it back up later on or do I have to restart the render from Frame 0?
Hi,
ReplyDeleteThanks for the tutorial. I am having a problem with my final render. based on the progress window, the irradiance map and LC map cannot be loaded. is this the reason why my render becomes colourful?what i mean with colourful is all black color became somewhat like an exposed film.
Thanks for the tutorial. I am having a problem with saving ir and lc maps. I save them one folder. Then I click load, but the folder is empty. I am using Vray 2.0 beta.
ReplyDeleteThis comment has been removed by the author.
ReplyDeletemaybe i can try this tutorial after i ve pc support for do it,, however its very helps full,, thanks alot
ReplyDeleteHello,
ReplyDeleteThank you for the tutorial and tutorials. They helped me a lot.
However, I have some questions/ doubts:
1. For an animation of 8 seconds (using the settings in this tutorial) I had to wait from 8:30 pm to 5:30 am for V-ray Sketch-up to render my frames. I think this is too long. I'm planning to do a 2 minute animation and I don't want to render for days. Can you provide some setting for a faster render, but still keep some quality of the image? I already removed the reflections and glossiness of the materials. I don't know what I'm doing wrong.
2. Do you have a tutorial for a mix of outdoor and indoor animation settings? I'm trying to do this but when enter the setting for outdoor rendering, the indoor has no light, and when I enter the indoor settings, the outdoor is to bright.
Please, can you help me?
Thank you again for the tutorials.
Best regards,
Irina
This comment has been removed by the author.
ReplyDeleteAmazing blog you have here, i'm sure this can attract lots of readers over the net for the cool write up. Keep it up
ReplyDeletearchitecture animation
Thanks for the interesting post! Maybe someone looking for 3d render service for architects and designers. I found good one - archicgi.com.
ReplyDeleteIt’s really great post, nice blog..I would like to appreciate your work and would like to tell to my friends.
ReplyDeleteAmarillo Foam Insulation
so my GI settings are missing under the global switches, I don't know where the "don't render image" option is. Can someone please help?
ReplyDeleteits on Global switches , on Indirect Illumination section, you can see Dont render final image checkbox
DeleteThanks for nice list. Keep posting more.. We will be happy 3d Visualization in Bangalore | 3d Visualization Company in Bangalore
ReplyDeleteGreat tutorial. But I have a liitle problem. I'd passed all the steps, but when I am at the exportation of video, I can not see any option of video format for my video to save as.
ReplyDelete3D Animation: What the Doctor Ordered
ReplyDeleteThe international animation market was valued at $254 billion by 2017. The market has undoubtedly grown since that time. This industry is bound to grow, particularly now that it has proved to be an effective marketing strategy.
Why Have 3D Animation?
When many people believe 3D animation, they think entertainment. This is mainly because animation has kept us fascinated in movie theatres for the longest time. These days, however, animation is present beyond the cinema halls -being used to showcase products.
Does 3D animation beat traditional methods of showcasing products?
Well, to be honest, it WORTH More Than THAT!
Think about giant brands like Gillette and the popular Apple. Gillette, for instance, uses 3D animation to transform a daily shave into an adventure. Now consider at the extent of trust the marketing strategy garners for the brand. As its competitors utilize traditional marketing, Gillette infuses some 3D adventure to set itself apart. At the end of the day, a top quality animation reflects well on your brand. Employ 3D product animation and join the growing list of businesses that are dominating their niches.
There are three main reasons why you need to add 3D animation to your marketing stratagem:
1.Profit Minded Prototyping: Releasing a prototype to the market is a really costly affair. Now, to be fair, the role played by prototypes makes them worth every penny but, what if we could get the similar results without using expensive prototypes? Well, now there is. 3D product animation models your product in an online world and exposes it to the market. That is to say, you have the required feedback from the market without suffering the cost of a prototype.
2.First Impressions Matter Most: Products are rarely entertaining to look at. Just imagine a Gillette ad without the animation. Boring, right?
3D product animation takes an ordinary looking item and changes it into an adventure of epic proportions. In the online world, any product gets exciting with a few 360-degree turns and just the right amount of special effects. Utilize animation to strike a chord with the market of interest.
The iPhone X is a great example. The marketing strategy was predominantly centered on3D models. Some other brands including Microsoft, Huawei, and Samsung have also used 3D product animations. It is no wonder they lead their markets.
3.Money Talks: 3D product animation helps save money. The 3D model can even be used to determine glitches in an unfinished product. Designers can change the product after analyzing its model without physical prototyping.
On top of that, animation is a really cost-effective marketing system. Just look at the popularity of 3D modelling rigs and Virtual Reality equipment to get a feel of just how hungry the world is for 3D.
In a nutshell, animation technologies will bring good tidings to your product. The animation will give your product an aura of suspense and class that the market just finds irresistible. Animation also provides the brand legitimacy as a modern oriented firm. You will be amazed to know how many great products fail to sell because of how they introduced themselves to the market.
Don't add to that sad statistic. Stir things up. Turn your advertisement into a 3D tale presenting your product as the elegant and irresistible hero. Everybody likes those, or don't you?
Nomeradona Sketchup Vr: Tutorial: Vray Sketchup Animation >>>>> Download Now
ReplyDelete>>>>> Download Full
Nomeradona Sketchup Vr: Tutorial: Vray Sketchup Animation >>>>> Download LINK
>>>>> Download Now
Nomeradona Sketchup Vr: Tutorial: Vray Sketchup Animation >>>>> Download Full
>>>>> Download LINK
This is very nice information about the 3d product animations ,Thank you so much for sharing your knowledge. keep it up
ReplyDelete