Pages
COPYRIGHT
All resources offered by this blogsite are shared by the authors themselves. Some of them were rewritten with permission and some were collected throughout the internet and exchanged between peers for personal study. Use of any resources offered for commercial purposes is prohibited. Otherwise you need to responsible for any consequences produced! Any profitable behavior of utilizing the resources downloaded from this site is condemned and disdained sternly.
Some of the resources, and data here were shared by the authors freely and we don't have all the capacity to know, if the components, materials inside the scenes were copyright protected. If you feel some resources have infringed your copyright, please contact us. We will delete them as quickly as possible. We won't bear any legal responsibility for the resources. Thanks.
Custom Search
Custom Search
Welcome to SketchUp, Vray and other Resources
Everyone is capable of learning. Learning is part of life. It is a social process of living and bringing everyone to share their inherited resources and discoveries. All of us can influence the life of others through sharing and caring. It is our belief that everyone should be a lifelong learner.
I am putting very important visualization resources and series: tutorials, tips, tricks, VRAY materials and settings, and mini-the-making (MTM) processes.
Yours,
Nomeradona
I am putting very important visualization resources and series: tutorials, tips, tricks, VRAY materials and settings, and mini-the-making (MTM) processes.
Yours,
Nomeradona
Showing posts with label Basic Vray Sketchup Tutorial Series. Show all posts
Sunday, 21 October 2012
Saturday, 24 March 2012
Basic VRAY SketchUp Tutorial Series 4
Here is my Basic Vray SketchUp Tutorial Series 4 which focus with Diffuse Map and how to control this map effectively.
Before staring this tutorial it is advisable to read the following tutorials:
Anyhow Here the 4th entry for this series
Step1: Selecting the texture.
You can select the texture in two ways. The first one is using the Vray Material Editor and the second one is using the native Sketchup Material editor. Use the eyedropper icon and point the material you want to edit. In this case, I choose the wallpaper 2 (see screen grab below)
Once the texture is selected, you will see in the Vray Material Editor that this material is selected and highlighted. Any material that you created in SketchUp from Vray SketchUp 1.33 up, will have VRAY material automatically.
Step 2: Adding bump map.
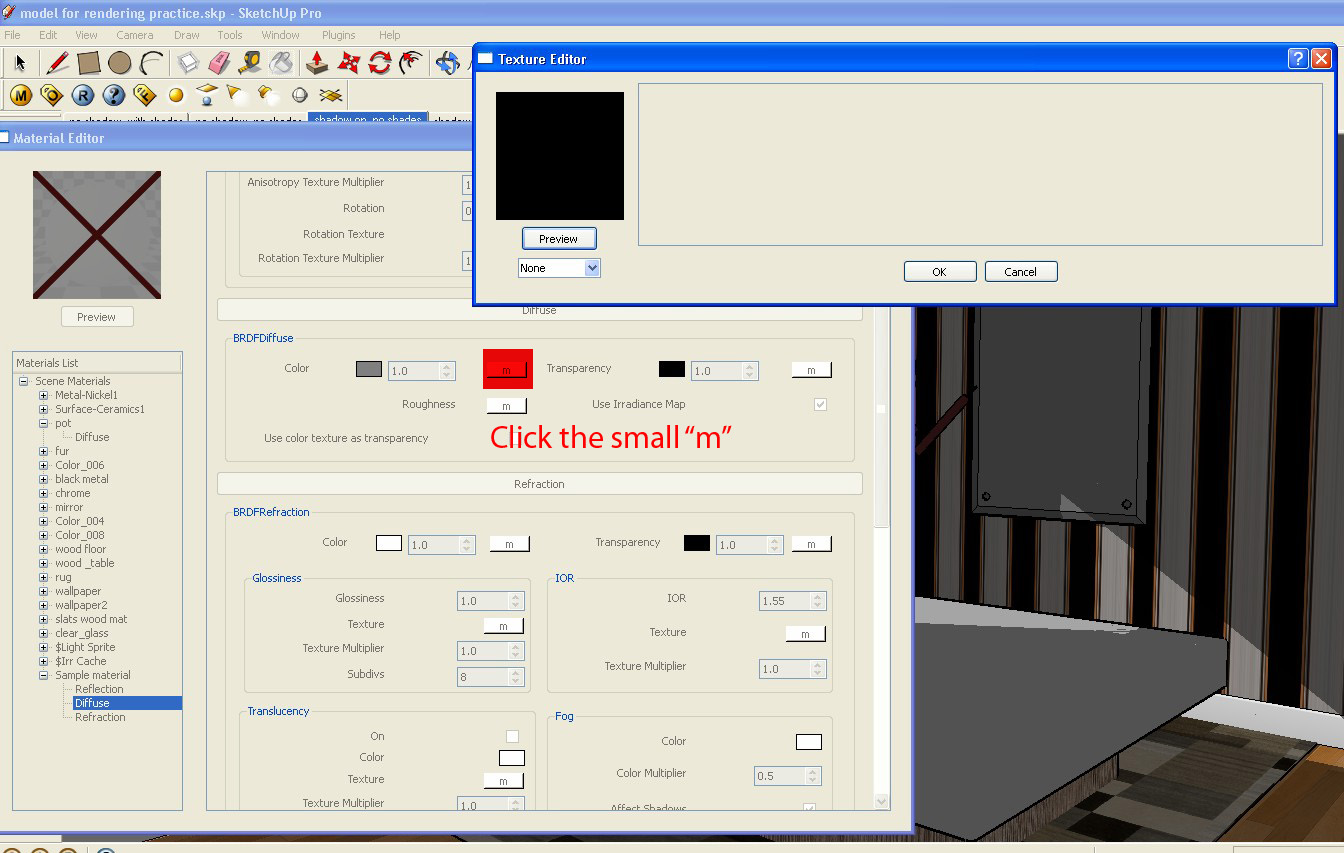
Let us add Bump map. Go to the Maps tab, click the small "m" to the right.

Once clicked, this new tab will appear. Under Map type, select "Texbitmap". Go to Bitmap Buffer, click the small box on the right of the File. Load your Bump Map.
Here is the Bumpmap that we will be using for this tutorial.

The 2nd Diffuse map shows up in the screen grab, what happen to the Diffuse 1 ? Well its under this second diffuse material that we put on the top layer. Don't worry we will just use this to adjust the position and scale of the bump map.In the screen grab below, the bump map scale is showing and its too small to see.
PART 2: Creating Decal Material
Next we will create a decal material and we will adjust the scale and position of this material. Let use the mirror to do this. Use the eyedropper of the Native SketchUp Material Editor like in Step1 and select the mirror material. Below shows the highlighted mirror material
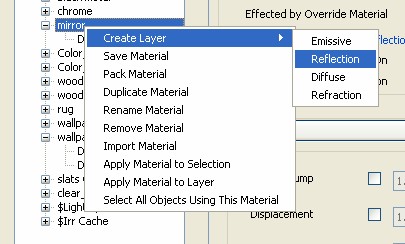
Let us create reflection Layer.
Since we did not put any map to the reflection layer, this suggest that the material is 100% reflective (like mirror material).
Here is the render. See the effect of the mirror material
Creating the Decal Map
Let us first create the decal map using Photoshop. In Photoshop, I quickly added some texts.
Be sure the background is transparent. Save it in png format.
Now let us follow what we have done in tutorial 3. Move the Diffuse layer on top of the Reflection Layer. Load in the diffuse layer the decal map that we have done in Photoshop.

Below shows the effect of the diffuse map to the mirror. It's repeating many times. This time we will adjust the texture position and scale.
Again by using the Native Sketchup Material editor adust the scale.
Adjust also the position by right clicking the mouse.
You can also use the pins (by unfixing them) in adjusting both the scale and position. Ok I'm satisfied with this.
Now, this is the most important in decal. Be sure to click 'Use color texture as transparency".
Here is the final render. Notice the effect of decal to the mirror.
Before staring this tutorial it is advisable to read the following tutorials:
Basic Vray Sketchup Tutorial Series 1
Basic Vray Sketchup Tutorial Series 2
Basic VRAY SketchUp Tutorial Series 3
Anyhow Here the 4th entry for this series
PART 1: Adjusting the Texture Position
You can select the texture in two ways. The first one is using the Vray Material Editor and the second one is using the native Sketchup Material editor. Use the eyedropper icon and point the material you want to edit. In this case, I choose the wallpaper 2 (see screen grab below)
Once the texture is selected, you will see in the Vray Material Editor that this material is selected and highlighted. Any material that you created in SketchUp from Vray SketchUp 1.33 up, will have VRAY material automatically.
Step 2: Adding bump map.
Let us add Bump map. Go to the Maps tab, click the small "m" to the right.

Once clicked, this new tab will appear. Under Map type, select "Texbitmap". Go to Bitmap Buffer, click the small box on the right of the File. Load your Bump Map.
Here is the Bumpmap that we will be using for this tutorial.
When we apply a different bump map with different pattern from diffuse map, we won't have any idea how the bump map is pplied. In the below screen grab only the diffuse map shows, we wont have any idea how will be the effect of the wooden weave bump map that we applied. To control the UV position and scale of the bump map we will go to the next step.
Step 3: Adjusting the position and scale of the Bump map.
First of all, I would like to recognize Fernando Rentas, I owed this one from him.
We can adjust the scale and position of bumpmaps or any other maps like displacement, reflection etc. by creating a proxy diffuse map and placing it on the upper stack. We will load the same material we used in the bumpmap in this proxy diffuse material. We will make the proxy diffuse map as transparent so as to have no effect to our original diffuse map. Here is how to do it.
a. Create second diffuse layer

b. You can rename this second diffuse layer (in my case Diffuse_UV MAP), and move it on the upper stack. Load the same bump map on the second diffuse map.
The 2nd Diffuse map shows up in the screen grab, what happen to the Diffuse 1 ? Well its under this second diffuse material that we put on the top layer. Don't worry we will just use this to adjust the position and scale of the bump map.In the screen grab below, the bump map scale is showing and its too small to see.
c. Adjust the Diffuse proxy map.
To adjust the scale, we always advise you to use the Sketchup Native material editor. It's, exact, easier, faster and the effect can be seen immediately in real-time.
Below, I entered 200x 200.. The image scale has been adjusted in real time.
d. Adjusting the Color Transparency. Let us now adjust the transparency of the diffuse proxy map. You can do this quickly by putting white color to the color swatch. But the problem, you will end up on making the wall transparent also. The best way to do it is by assigning an A color map with 'white' hue. See image below.
Here is the render. We can see the effect of the bump map to the wall. We also managed to adjust the scale of the bump map.
Next we will create a decal material and we will adjust the scale and position of this material. Let use the mirror to do this. Use the eyedropper of the Native SketchUp Material Editor like in Step1 and select the mirror material. Below shows the highlighted mirror material
Let us create reflection Layer.
Since we did not put any map to the reflection layer, this suggest that the material is 100% reflective (like mirror material).
Here is the render. See the effect of the mirror material
Creating the Decal Map
Let us first create the decal map using Photoshop. In Photoshop, I quickly added some texts.
Be sure the background is transparent. Save it in png format.
Now let us follow what we have done in tutorial 3. Move the Diffuse layer on top of the Reflection Layer. Load in the diffuse layer the decal map that we have done in Photoshop.

Below shows the effect of the diffuse map to the mirror. It's repeating many times. This time we will adjust the texture position and scale.
Again by using the Native Sketchup Material editor adust the scale.
Adjust also the position by right clicking the mouse.
You can also use the pins (by unfixing them) in adjusting both the scale and position. Ok I'm satisfied with this.
Now, this is the most important in decal. Be sure to click 'Use color texture as transparency".
Here is the final render. Notice the effect of decal to the mirror.
Sunday, 19 February 2012
Basic VRAY SketchUp Tutorial Series 3
The next segment of this Basic VRAY SketchUp tutorial focuses in introducing Nomeradona's approach with material. This is just the beginning overview. There will be more sub-topics coming soon.
If you missed the previous segment be sure to read them first.
Basic VRAY SketchUp Tutorial Series 1
Basic VRAY SketchUp Tutorial Series 2
Ok let's start!
1. The VRAY Material Editor
The icon for the material editor is the firs one "M".
2. Adding keyboard shortcut
I love putting my shortcuts in SketchUp. I also assigned "m" for my VRAY material editor. If you want to create your own keyboard shortcuts, go to system preference. (see image below). This is a very good time saver. Once the shortcut has been assigned, you can automatically open the VRAY Material editor using the keyboard shortcut (in my case, I assigned "m").
Creating New VRAY Standard Material
If you apply the material in SketchUp, VRAY will automatically create a VRAY material. You can also create and load vismat materials. In this segment let me concentrate in doing a new "standard" material (other materials will be tackled in other tutorials). To create a VRAY Standard material, all you need is to highlight "Scene Material" then right click mouse (another tab will appear). Highlight create and again you will have 5 different types of materials (angle blend, SKp two sided, standard, toon and two sided). Click Standard.
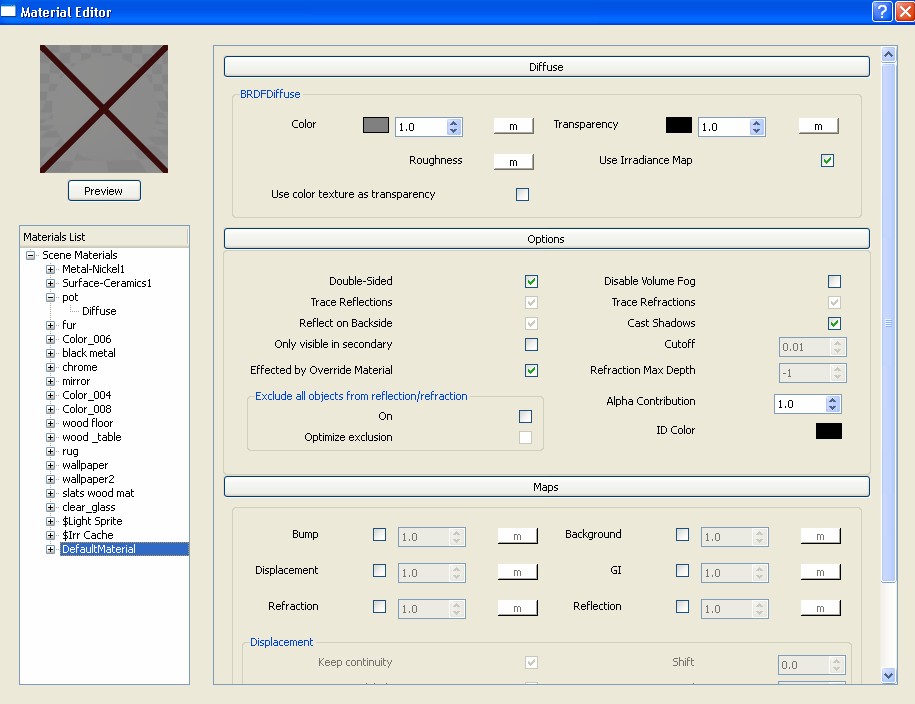
Once standard material was clicked, this new material will be created. You will notice Vray will stack in the very last and name it "Default Material". This default material will have three properties (diffuse, options and maps)
3. Renaming your VRAY Material
Renaming material is pretty simple. Highlight the material you want to rename and right click mouse. Click rename material and type the desired name.
Note: Using the same approach, you can save, pack, duplicate, remove, import, apply or even select all objects that use the material.
4. VRAY Layers
Each VRAY MATERIAL does not only have properties, but can have also different layers. Vray layers are like stacks of paper or transparencies on top of each other. This understanding must be noted as early as possible. The reflection layer is like a varnish that you apply on top of the stacks. You can apply as many layers as you wish. In this tutorial, I wont talk about UV and I want to do a separate tutorial just for this subject.
5. Creating VRAY Layers.
To create Vray Layer, you need to highlight the material you want to add layer. Right Mouse click then highlight create layer. Four layer types (emissive, reflection, diffuse and refraction) can be selected.
The Reflection Layer
Refraction Layer
Emisive Layer (self emitting layer material)
6. Removing Layer
To remove layer, all you have to do is to highlight the layer, right click mouse and select Remove Layer.
You can also add as many layers as you want. For advance materials, usually you can play with two different reflection materials, or two different diffuse materials. You can also change the position of this layer by moving the layer above or below the stacks.
7. Adding/loading Maps
Once you see a small "m"in any box, this indicates that you can load a texture map here. If a capital "M" is showing in this box, this means a texture map of any type is applied. To apply or load a texture map, simply click the small 'm'. In the particular example below, I clicked the "m" in the diffuse layer. Once clicked, a new tab will appear. The small square window is the preview window. This is a very useful tool to preview the material. Under it is a small scroll window where you can load the different texture map types. On the right is the property window that display the different properties that can affect this texture map.
8. Texture Map Types
There are different map types that you can load here: TexAColor, TexBitmap, Texblend etc. Let us use the the common one the "TexBitmap".
Note: All other Map types are procedural maps except the TexBitmap
9. Texture Bitmap Properties
Each texture bitmaps have different properties. Below is the Window properties of Texbitmap.
10. Loading Bitmap File
To load bitmap file, click the small box on the right of File. (see image below).
Browse the location of the file you want to load and click open.
11. Applying Vray Material
Although you can apply the material using the VRAY Material Editor, I will not advise this especially with high poly-models - its very very slow. To apply the material, use the native SketchUp paint bucket .
Note: The highlighted material in VRAY material is the same material selected in the Native Sketchup Material Editor once paint bucket is selected.
To apply the material, simply select the faces you want to apply the material.

In the image below the material has been applied. Notice that tiling (repeat of texture) is so obvious. I purpose applied a non-seamless material so as to help you in the very beginning how to manage your bitmap texture.
12. Nomeradona's strategy with SketchUp Materials.
The first thing that one must remember is the texture file size. Using hi-res photos in VRAY SU is a no-no with me, because of two main reasons: I notice that they need much memory, which actually you should allocate during rendering and second I notice that parsing and rendering time is a bit longer.
My first step is finding the balance. I usually re-size my texture to 520px width using Photoshop. You might asked me but how about printing big image.. Printing big image is another issue but you can always use other software on this matter.
The second thing is making the texture seamless in order to avoid obvious tiling.There are lots of software design in creating seamless texture. My favorite is Pixplant and Crazybump. You can also use Photoshop using this quick tutorial.
Step 1: Load the texture
Step 2: Use filter/other/offset
Below is the effect of offset tool. It will shift the edges of original texture both vertically and horizontally.
Step 3: Use Patch tool.
Select the seamed area and drag it to another area.

Step 4: Use Clone stamp tool.
You can also use the clone stamp tool by taking some sample and stamping in on the areas you need to correct.
below shows the corrected texture, the obvious line is gone.
I reloaded the corrected texture in the File tab.
Here is the corrected texture. Tiling is not obvious anymore.
Step 5: Adjusting the texture UV
I normally adjust my texture UV using the native editing of Paint bucket.
13: Region Render.
Another good addition with VRAY is the region render. You don't have to render the whole image. I normally use the region render to render the area I want to see. During this stage, I also use the save maps (see Basic VRAY SketchUp tutorial No.2). Click the region render icon and drag to the area you want to render. Then hit render.
14. Mirror Material
The screen grab below shows the finished render. But wait what happen to the wood material we applied on the table. This one looks like mirror.
Well it's look like a mirror because in the Reflection Layer, there is no map loaded. Notice the 'm'.
Be aware that if there is no Map type loaded in the reflection layer, VRAY will read the reflection as 100% reflective. So any material you put in the diffuse layer, the reflection layer will disregard it.
15. Fresnel Map Type in the reflection layer
Now let us load fresnel map in the reflection layer. Click the 'm' box beside reflection. Under the map type select the TexFresnel.
Here is the TexFresnel properties window. For the moment click ok.
Here is the finished render using the render region. Ohh it looks like plastic.
16. Blurry Reflection
In order to create blurry reflection, we need to lower both highlight and reflection glossiness to 0.85 and adjust the Subdivision to 16.
Here is the finished render using the render region.
Bonus...
Download the materials I did. We will use these later.
Diffuse map
Displacement/bump map
Specular map.
Finished render during this stage
If you missed the previous segment be sure to read them first.
Basic VRAY SketchUp Tutorial Series 1
Basic VRAY SketchUp Tutorial Series 2
Ok let's start!
1. The VRAY Material Editor
The icon for the material editor is the firs one "M".
2. Adding keyboard shortcut
I love putting my shortcuts in SketchUp. I also assigned "m" for my VRAY material editor. If you want to create your own keyboard shortcuts, go to system preference. (see image below). This is a very good time saver. Once the shortcut has been assigned, you can automatically open the VRAY Material editor using the keyboard shortcut (in my case, I assigned "m").
Creating New VRAY Standard Material
If you apply the material in SketchUp, VRAY will automatically create a VRAY material. You can also create and load vismat materials. In this segment let me concentrate in doing a new "standard" material (other materials will be tackled in other tutorials). To create a VRAY Standard material, all you need is to highlight "Scene Material" then right click mouse (another tab will appear). Highlight create and again you will have 5 different types of materials (angle blend, SKp two sided, standard, toon and two sided). Click Standard.
Once standard material was clicked, this new material will be created. You will notice Vray will stack in the very last and name it "Default Material". This default material will have three properties (diffuse, options and maps)
3. Renaming your VRAY Material
Renaming material is pretty simple. Highlight the material you want to rename and right click mouse. Click rename material and type the desired name.
Note: Using the same approach, you can save, pack, duplicate, remove, import, apply or even select all objects that use the material.
4. VRAY Layers
Each VRAY MATERIAL does not only have properties, but can have also different layers. Vray layers are like stacks of paper or transparencies on top of each other. This understanding must be noted as early as possible. The reflection layer is like a varnish that you apply on top of the stacks. You can apply as many layers as you wish. In this tutorial, I wont talk about UV and I want to do a separate tutorial just for this subject.
5. Creating VRAY Layers.
To create Vray Layer, you need to highlight the material you want to add layer. Right Mouse click then highlight create layer. Four layer types (emissive, reflection, diffuse and refraction) can be selected.
The Reflection Layer
Refraction Layer
Emisive Layer (self emitting layer material)
6. Removing Layer
To remove layer, all you have to do is to highlight the layer, right click mouse and select Remove Layer.
You can also add as many layers as you want. For advance materials, usually you can play with two different reflection materials, or two different diffuse materials. You can also change the position of this layer by moving the layer above or below the stacks.
7. Adding/loading Maps
Once you see a small "m"in any box, this indicates that you can load a texture map here. If a capital "M" is showing in this box, this means a texture map of any type is applied. To apply or load a texture map, simply click the small 'm'. In the particular example below, I clicked the "m" in the diffuse layer. Once clicked, a new tab will appear. The small square window is the preview window. This is a very useful tool to preview the material. Under it is a small scroll window where you can load the different texture map types. On the right is the property window that display the different properties that can affect this texture map.
8. Texture Map Types
There are different map types that you can load here: TexAColor, TexBitmap, Texblend etc. Let us use the the common one the "TexBitmap".
Note: All other Map types are procedural maps except the TexBitmap
9. Texture Bitmap Properties
Each texture bitmaps have different properties. Below is the Window properties of Texbitmap.
10. Loading Bitmap File
To load bitmap file, click the small box on the right of File. (see image below).
Browse the location of the file you want to load and click open.
11. Applying Vray Material
Although you can apply the material using the VRAY Material Editor, I will not advise this especially with high poly-models - its very very slow. To apply the material, use the native SketchUp paint bucket .Note: The highlighted material in VRAY material is the same material selected in the Native Sketchup Material Editor once paint bucket is selected.
To apply the material, simply select the faces you want to apply the material.

In the image below the material has been applied. Notice that tiling (repeat of texture) is so obvious. I purpose applied a non-seamless material so as to help you in the very beginning how to manage your bitmap texture.
12. Nomeradona's strategy with SketchUp Materials.
The first thing that one must remember is the texture file size. Using hi-res photos in VRAY SU is a no-no with me, because of two main reasons: I notice that they need much memory, which actually you should allocate during rendering and second I notice that parsing and rendering time is a bit longer.
My first step is finding the balance. I usually re-size my texture to 520px width using Photoshop. You might asked me but how about printing big image.. Printing big image is another issue but you can always use other software on this matter.
The second thing is making the texture seamless in order to avoid obvious tiling.There are lots of software design in creating seamless texture. My favorite is Pixplant and Crazybump. You can also use Photoshop using this quick tutorial.
Step 1: Load the texture
Step 2: Use filter/other/offset
Below is the effect of offset tool. It will shift the edges of original texture both vertically and horizontally.
Step 3: Use Patch tool.
Select the seamed area and drag it to another area.

Step 4: Use Clone stamp tool.
You can also use the clone stamp tool by taking some sample and stamping in on the areas you need to correct.
below shows the corrected texture, the obvious line is gone.
I reloaded the corrected texture in the File tab.
Here is the corrected texture. Tiling is not obvious anymore.
Step 5: Adjusting the texture UV
I normally adjust my texture UV using the native editing of Paint bucket.
13: Region Render.
Another good addition with VRAY is the region render. You don't have to render the whole image. I normally use the region render to render the area I want to see. During this stage, I also use the save maps (see Basic VRAY SketchUp tutorial No.2). Click the region render icon and drag to the area you want to render. Then hit render.
14. Mirror Material
The screen grab below shows the finished render. But wait what happen to the wood material we applied on the table. This one looks like mirror.
Well it's look like a mirror because in the Reflection Layer, there is no map loaded. Notice the 'm'.
Be aware that if there is no Map type loaded in the reflection layer, VRAY will read the reflection as 100% reflective. So any material you put in the diffuse layer, the reflection layer will disregard it.
15. Fresnel Map Type in the reflection layer
Now let us load fresnel map in the reflection layer. Click the 'm' box beside reflection. Under the map type select the TexFresnel.
Here is the TexFresnel properties window. For the moment click ok.
Here is the finished render using the render region. Ohh it looks like plastic.
16. Blurry Reflection
In order to create blurry reflection, we need to lower both highlight and reflection glossiness to 0.85 and adjust the Subdivision to 16.
Here is the finished render using the render region.
Bonus...
Download the materials I did. We will use these later.
Diffuse map
Displacement/bump map
Specular map.
Finished render during this stage
Subscribe to:
Posts (Atom)